| Music | Writing | Travelogues | Shakespeare Resource Center | Contact | |
Introduction | Required Tags | Formatting, Part I | Formatting, Part II | Links | Lists | Tables | Images | Other Resources
In our last lesson, we will explore the use of images in the Web page. Once people could get their written content online, the next logical step was finding a way to include pictures on the page. This has led alternately to some of the best—and worst—pages on the World Wide Web. You see, for every pro, there is a con; text doesn't take an overly long time to deliver from the server to your browser, but graphics can be real size hogs, which means longer download times for pages. We'll cover here the basic use of the <IMG> tag, what image formats will work on the Web, and how to keep from designing a page that will have your visitors waiting forever for your content to appear.
Images are not embedded in a Web page; each image that you want to display is a separate file. As an example, if you wanted to create a biography page that included a picture of yourself, you will create an HTML file (e.g., biography.html) with a reference to your picture file. Both of these files would need to be on your server for the picture to appear as part of your Web page. This is also important because it means that to see the page with the graphic, your browser is going to make two requests to the server, one for the HTML file and one for the image file that it calls. (These requests are referred to as "hits" to the server, incidentally. Your file and the one image comprise two hits; if you had two images, your page would generate three hits every time it was requested, etc.) Also, image files are generally larger and more complex than the HTML files that call them; this is why you will usually see the text of a page appear before the images are finished rendering. The additional file size means that you should be judicious in your use of images on a page, as the more that you call, the longer that page will take to complete downloading in the browser.
Only certain image files will display on the Web. The most common filetypes are GIF, JPG, and PNG. You may need additional software such as PhotoShop or PaintShop Pro in order to create these files. The images must have the GIF, JPG, or PNG file extension and must be in RGB color format to display properly.
So, let's say you have your biography page and your image file. How does the HTML file reference the image so that it will appear on the page? You will insert an <IMG> tag, which, like the <BR> and <HR> tags discussed earlier, is a single tag that you will put exactly where you wish the image to appear on the page. However, merely inserting the <IMG> tag into your code will do nothing. Why? You haven't told it what image to use. Like other tags we've covered, the IMG tag takes certain attributes that define what image will be called and how that image will be displayed.
| align | This attribute defines how the image will align with other elements on the HTML page. For instance, an align="left" attribute on the image will place the image on the left side of the page, wrapping any other content around it until the bottom of the image is reached. |
| alt | This attribute specifies what text should be shown if the image isn't loaded. In certain browsers, this text will appear when mousing over the image. Alt text is also used by speech-reader browsers. |
| border | This attribute specifies the thickness in pixels of a border if you want to place one around the image. |
| height | This attribute specifies the height of the image in pixels. This should only be used to specify the actual dimensions of the image; you should not use this attribute to "resize" the height of the image (see below). |
| hspace | This attribute specifies a horizontal buffer space in pixels around the image. |
| src | This attribute is the most important one, because it specifies the path and filename of the image to use. It's good practice to make this the first attribute in the tag. |
| vspace | This attribute specifies a vertical buffer space in pixels around the image. |
| width | This attribute specifies the width of the image in pixels. This should only be used to specify the actual dimensions of the image; you should not use this attribute to "resize" the width of the image (see below). |
There is a very good reason to use the width and height attributes in your code; their values tell the browser to reserve the proper dimensions when rendering the page while you're waiting for the image(s) to finish loading. However, some people use these attributes to render the image a little "bigger" or "smaller" on the page. This is an improper usage of the attributes because:
The moral of the story is to always create your image with dimensions in mind, and then use these attributes to confirm, not change, those dimensions. It's bad form otherwise.
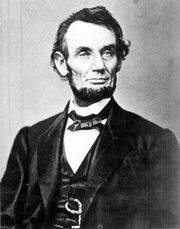
In past lessons, we explored HTML by use of the Gettysburg address. We're going to return briefly to this old saw to demonstrate the usage of the <IMG> tag. Let's say we wanted to add a photograph of Abraham Lincoln to the text to punch up the page a little more. First, we'll need a graphic of Lincoln, which we'll call lincoln.jpg. We're going to add it to the last example of our Gettysburg address. Assuming we've uploaded the graphic into the same directory of the web page, we're going to add one line of code that looks like this:
<IMG src="lincoln.jpg" width="180" height="229" border="1" align="right" alt="Abraham Lincoln">
Let's break this down attribute by attribute to explain what that code will do to render the image on the page:
We will add the image so that it appears with the first paragraph of the address:
<H1 align="center">The Gettysburg Address</H1>

<HR>

<P><IMG src="lincoln.jpg" width="180" height="229" border="1" align="left" alt="Abraham Lincoln">
Four score and seven years ago our fathers brought forth on
this continent a new nation, conceived in liberty and dedicated
to the proposition that all men are created equal.</P>
This would be displayed on the page like this:
The Gettysburg Address
|
(For the full example page, click here.)
Because of their impact on both screen real estate and the download time of the page, images should be used judiciously rather than just heaped into your pages. A good rule of thumb is to keep the total size of both your HTML file and any associated graphics to under 100 KB. Also, it's a good idea to always ask if the image you're about to put on the page actually adds anything to the content; if it doesn't, then all you're doing is adding empty calories to the page, and you're better off without it. And by the by: the only people impressed with animated graphics are people who think that motion is a good substitute for substance.
Congratulations! You've made it through the Practical HTML Primer. But this is actually only the beginning if you're serious about HTML; visit the Other Resources page for more links to learning HTML on the Web.
 Four score and seven years ago our fathers brought forth on
this continent a new nation, conceived in liberty and dedicated
to the proposition that all men are created equal.
Four score and seven years ago our fathers brought forth on
this continent a new nation, conceived in liberty and dedicated
to the proposition that all men are created equal.